
Banded Glute Bridge | Proper Glute Activation Exercise | Life in Motion Chiropractic Livonia MI

Banded Glute Bridge
for True Glute Activation & Hip Stability

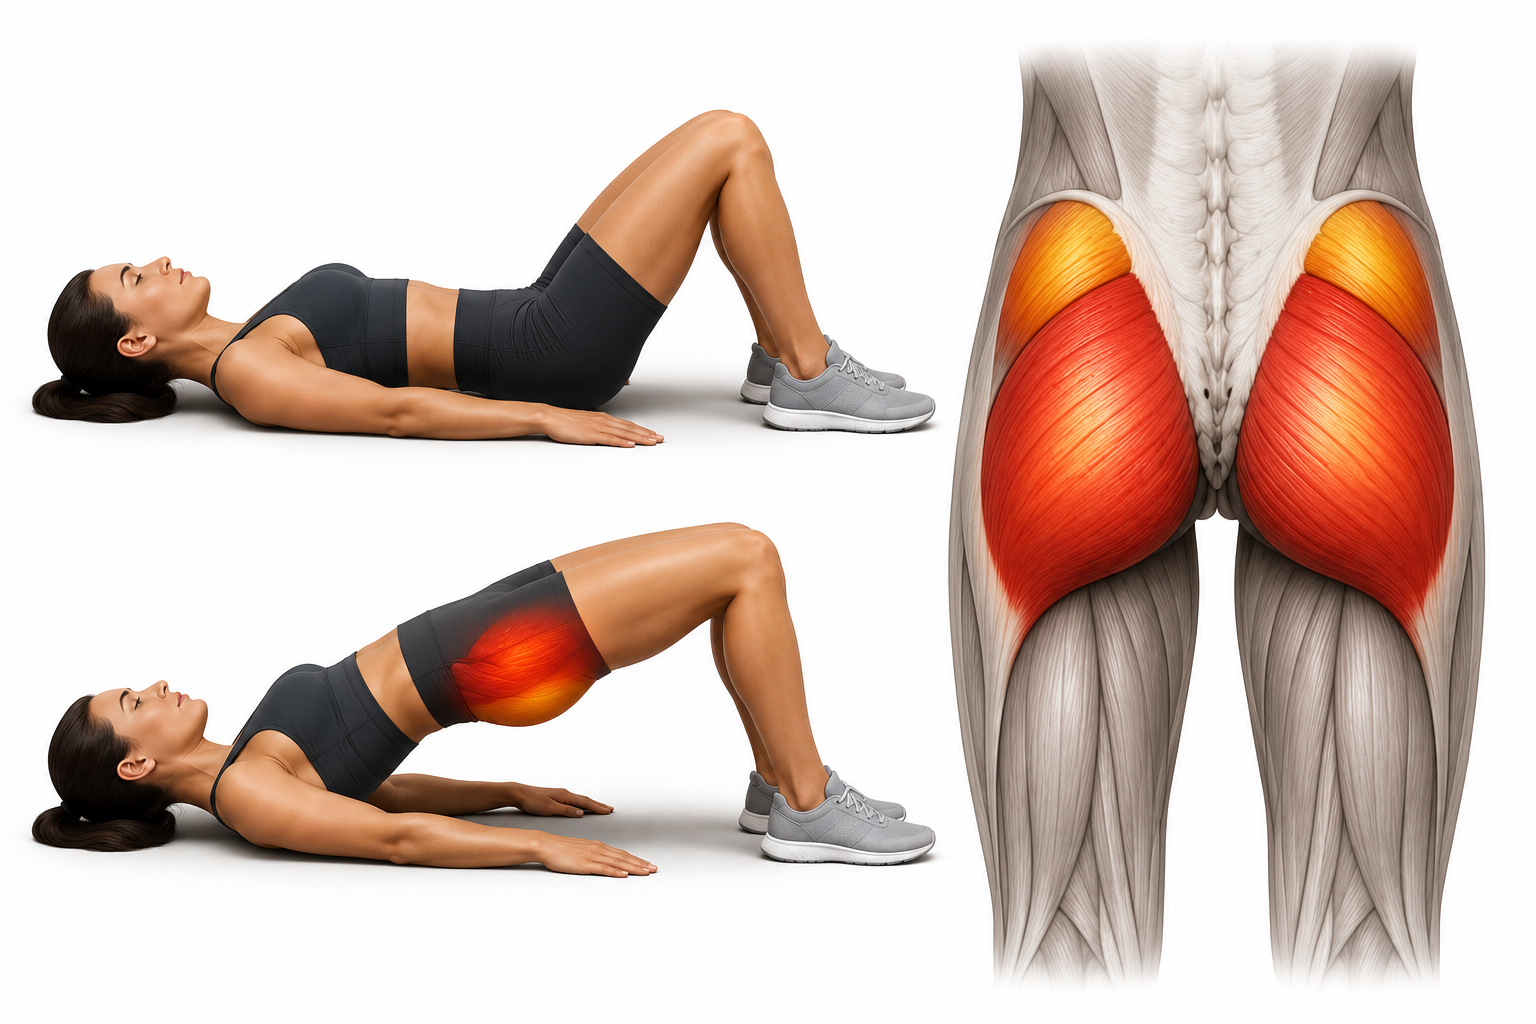
The glute bridge is one of the most commonly prescribed rehab exercises — and one of the most commonly performed incorrectly. Dr. Dockery’s banded version emphasizes foot tripod mechanics, abdominal pressure, and outward knee drive to shift the load to the glutes, not the hamstrings or low back.
5–10 min/day Resistance band required Beginner to intermediate Livonia, MI
Glute bridge activation and anatomy — gluteus maximus, pelvic stability, and hip extension at Life in Motion Chiropractic Livonia MI

What Is the Banded Glute Bridge?

The Banded Glute Bridge is a supine hip extension exercise performed with a resistance loop band around the knees. While glute bridges are extremely common in rehab and fitness settings, small errors in foot positioning and load distribution dramatically change which muscles actually do the work — and most people default to their hamstrings and low back rather than their glutes.

This version addresses that by layering three specific technique elements that together shift the movement to the glutes: a foot tripod (stable base of support through the foot), 360-degree abdominal pressure (core engagement that prevents lumbar extension compensation), and outward knee drive against the band (hip abductor co-activation that recruits the posterior glute rather than the hamstrings alone).

According to NIH research on glute activation strategies, the addition of hip abduction resistance during the bridge significantly increases gluteus maximus and medius EMG activity compared to standard bridges — making the banded version a materially more effective glute exercise than its unbanded counterpart.

Clinical note: The banded glute bridge is typically prescribed as a progression from the Banded Clam, which establishes glute medius activation in a non-weight-bearing position. Once the patient can reliably feel and activate the glute medius, the bridge trains both glute max and medius together in a movement pattern that transfers directly to standing, walking, and athletic activity.

Common Conditions This Exercise Addresses

Low back pain & instability
Weak or underactive glutes
Hip & pelvic stability deficits
Hamstring compensation patterns
SI joint dysfunction
Poor walking & running mechanics
Hip impingement
Athletic performance & injury prevention

Why foot loading changes everything: When weight shifts into the heels during a bridge, the hamstrings become the primary hip extensor because they are in the best mechanical position to pull from a heel-loaded posture. When weight is centered through the mid-foot (the foot tripod), the glutes become the dominant hip extensor. This is why foot position — not just “squeezing the glutes” — is central to making the bridge work as intended.

Step-by-Step Instructions

1

Set up with the band around the knees

Place a resistance loop band just above the knees. Lie on your back with knees bent and feet flat on the floor, hip-width apart. Let your arms rest at your sides with palms facing down for stability.

2

Create the foot tripod

Spread all five toes wide and press them actively into the floor. Create a stable three-point contact through the ball of the foot (under the big toe), the ball of the foot (under the little toe), and the center of the heel. This is your foot tripod — the base from which the glutes load. Keep pressure centered through the mid-foot, not pushed back into the heels.

3

Create 360-degree abdominal pressure

Before moving, gently expand the belly outward in all directions — front, sides, and toward the floor — to create intra-abdominal pressure. This stabilizes the pelvis and prevents the low back from extending to compensate when the hips rise. Maintain this pressure throughout every rep.

4

Drive the knees gently outward against the band

Apply light outward pressure against the resistance band — not enough to let the feet collapse inward, just enough to feel the outer hip muscles engage. This outward drive recruits the glute medius and shifts activation toward the posterior glute rather than the hamstrings. Hold this pressure throughout the movement.

5

Squeeze the glutes and lift the hips

Consciously squeeze the glutes — think about squeezing the back of the hip — and drive the hips upward into a bridge. The goal is a straight line from shoulders to knees at the top. Rise slowly and under control, taking about 2 seconds to reach the top position.

6

Hold briefly and lower slowly

Pause for 1–2 seconds at the top with the glutes actively squeezed. Then lower the hips slowly (2–3 seconds) back toward the floor — but don’t fully rest between reps. Maintaining a small amount of tension at the bottom keeps the glutes loaded through the set.

Common compensation: Feeling excessive cramping or tension in the hamstrings, or feeling the low back working hard at the top, are signs that weight has shifted into the heels or that the abdominal pressure has been lost. Reset the foot tripod, re-engage the core, and ensure the knee drive remains active before continuing.

Key Technique Points

Toes spread wide and actively pressing into the floor — this activates the intrinsic foot muscles and creates the stable tripod base that allows the glutes to load correctly
Pressure through mid-foot, not just the heels — feel all three points of the foot tripod equally; if your heels are the only thing on the floor, your hamstrings are doing the work
Outward knee drive maintained throughout — gentle, consistent pressure against the band; the knees should not cave inward at any point in the movement
Abdominal pressure held for the entire set — the core cage should feel pressurized before the hips leave the floor and remain so until they return; losing core pressure turns the bridge into a lumbar extension exercise
Squeeze comes from the back of the hip, not just the seat — mentally focus on squeezing the posterior gluteal region; patients who “clench” the seat often recruit the piriformis and TFL instead
Slow and controlled beats fast reps — the glutes are loaded most at the top of the bridge; rushing past the top position dramatically reduces glute activation time

Watch the Technique

Banded Glute Bridge — Life in Motion Chiropractic

Dr. Dockery demonstrates the foot tripod setup, abdominal pressure cues, outward knee drive, and how to identify hamstring vs. glute activation during the bridge.

Why This Exercise Works

Trains both gluteus maximus and medius simultaneously — the combination of hip extension (glute max) and outward knee drive against the band (glute medius) makes this one of the most complete glute exercises available in a supine position
Corrects the most common glute bridge failure mode — the foot tripod and mid-foot loading cue systematically removes the heel-driven hamstring compensation that makes most bridge programs far less effective than intended
Integrates the foot, core, and glutes as a system — the foot tripod, abdominal pressure, and outward knee drive train the three components that work together in every weight-bearing activity, making the pattern highly transferable to standing, walking, and sport
Reduces low back compensation during hip extension — proper abdominal pressure prevents the pelvis from anteriorly tilting at the top of the bridge, protecting the lumbar spine from extension overload that frequently causes low back tightness after bridge exercises
Natural progression from the Banded Clam — moves glute medius activation from the non-weight-bearing side-lying position into a functional weight-bearing pattern that more closely resembles the demands of gait and athletic movement
Scalable to any fitness level — lighter bands and bodyweight for early rehabilitation, heavier bands and holds for advanced strength and pelvic stability training

Frequently Asked Questions

I feel this in my hamstrings, not my glutes. What am I doing wrong?
This is the most common issue with glute bridges and almost always comes down to foot loading. If your heels are bearing most of the weight, the hamstrings become the primary hip extensors because of their mechanical advantage from that position. Re-check your foot tripod — spread the toes, find the three points of contact, and shift weight toward the center of the foot. Also check that your outward knee drive is active before the hips leave the floor, and that your core is pressurized. If the issue persists, Dr. Dockery may use hands-on cueing to help establish the correct activation pattern.
How does this differ from a regular glute bridge?
A standard glute bridge with no additional cueing often becomes a hamstring-dominant exercise, particularly in patients with inhibited glutes. The three additions in this version — foot tripod, abdominal pressure, and banded knee drive — each address a different compensation pattern that reduces glute activation. The band itself also increases gluteus medius demand by approximately 30–40% compared to an unbanded bridge, making it a materially different exercise from a muscle recruitment perspective.
My low back gets tight at the top of the bridge. Why?
Low back tightness at the top of the bridge is a classic sign of anterior pelvic tilt during hip extension — the pelvis tilts forward and the low back hyperextends to complete the movement rather than the glutes driving the hip into full extension. This usually means the abdominal pressure was lost before the hips reached the top. Focus on maintaining your core pressure throughout the full range of motion, and reduce your range slightly if the tightness persists. Dr. Dockery may also identify a hip flexor restriction that needs to be addressed before the bridge can be performed correctly.
How does the banded glute bridge relate to the banded clam?
The Banded Clam is typically prescribed first because it isolates the glute medius in a non-weight-bearing, low-demand position that makes it easier to establish the activation pattern without compensations. The banded glute bridge is the next step — it trains both the glute medius and glute maximus together under a greater load, and it does so in a position that more closely resembles weight-bearing. Most patients perform both in the same session.
What resistance band should I use?
Start with a light to medium band. The outward knee drive should require conscious effort against the band but should not cause the feet to roll inward or collapse. If you cannot maintain the foot tripod under the band’s resistance, the band is too heavy for your current hip abductor strength. Progress to heavier bands as the exercise becomes controlled and the glute activation pattern becomes consistent.
Can I do this with a herniated disc or SI joint pain?
The banded glute bridge is generally well tolerated for both disc and SI joint presentations because it strengthens the muscles that support and stabilize these structures without directly loading them. However, patients who experience pain or symptom reproduction during the exercise should stop and consult Dr. Dockery. In some disc presentations the hip flexion starting position may be aggravating — adjusting foot placement or range of motion can resolve this in most cases.

This content is for educational purposes only. Stop if symptoms worsen or pain develops, and consult Dr. Dockery if you are unsure whether this exercise is appropriate for your condition.

Build a Stronger Foundation in Livonia, MI

The banded glute bridge is most effective as part of a complete glute activation and rehabilitation program. Dr. Dockery serves patients throughout Livonia, Farmington Hills, Redford, Plymouth, and greater Wayne County.

Or call us at 734-427-6333