
9 Month High Oblique
Shoulder Sliders
An advanced integrated shoulder stability exercise prescribed by Dr. Dockery that combines the 9 month high oblique position with slider-based arm reaches — simultaneously training eccentric latissimus dorsi control, scapular stability, rotational trunk control, and glute activation in a single coordinated movement pattern.

What Is the 9 Month High Oblique Shoulder Slider?
The 9 Month High Oblique Shoulder Slider is an advanced shoulder stability and integrated movement exercise that uses slider pads (or a smooth surface) to create controlled eccentric loading of the shoulder, lat, and trunk as the arms slide outward from a specific rotational body position — and then demand active concentric pulling back to the start.
The name breaks into two components. The “9 month high oblique” position is a specific half-kneeling stance derived from Postural Restoration Institute (PRI) principles, in which the body is rotated and positioned to create an asymmetric challenge to the trunk, pelvis, and shoulder — mimicking the position a fetus occupies at approximately nine months gestation. This position loads the obliques, lats, and hip stabilizers in an integrated, rotationally biased way that flat bilateral exercises cannot replicate. The “slider” component then adds controlled eccentric and concentric shoulder loading through this asymmetric position, demanding that the rotator cuff, serratus anterior, lower trapezius, and latissimus dorsi work together to control the sliding arm while the trunk resists collapse.
According to Physiopedia’s review of shoulder complex rehabilitation, exercises that integrate scapular control with trunk rotation and distal limb loading are among the most clinically effective for restoring overhead mechanics, reducing impingement recurrence, and improving functional shoulder resilience — exactly what the 9 Month High Oblique Slider is designed to do.
Primary muscles trained: Latissimus dorsi (eccentric and concentric through the slide and return), serratus anterior (scapular protraction and upward rotation control), lower and mid trapezius (scapular stabilization during reach), obliques (anti-rotation trunk control in the asymmetric position), and gluteus medius/maximus on the down-side hip (maintaining pelvic position throughout). The rotator cuff co-activates throughout as dynamic shoulder joint stabilizers.
Clinical note: This is a progression exercise — it requires solid foundational shoulder stability before it delivers the intended training effect. Patients are typically working through the Scapular Push-Up, the TWL Exercise, and the 3 Month Supine Overhead Extension before advancing to this exercise. Dr. Dockery will confirm when the progression is appropriate based on your current shoulder mechanics and symptom presentation.
Common Conditions & Goals This Exercise Addresses
The 9 Month High Oblique Setup
What is the “9 Month High Oblique” position?
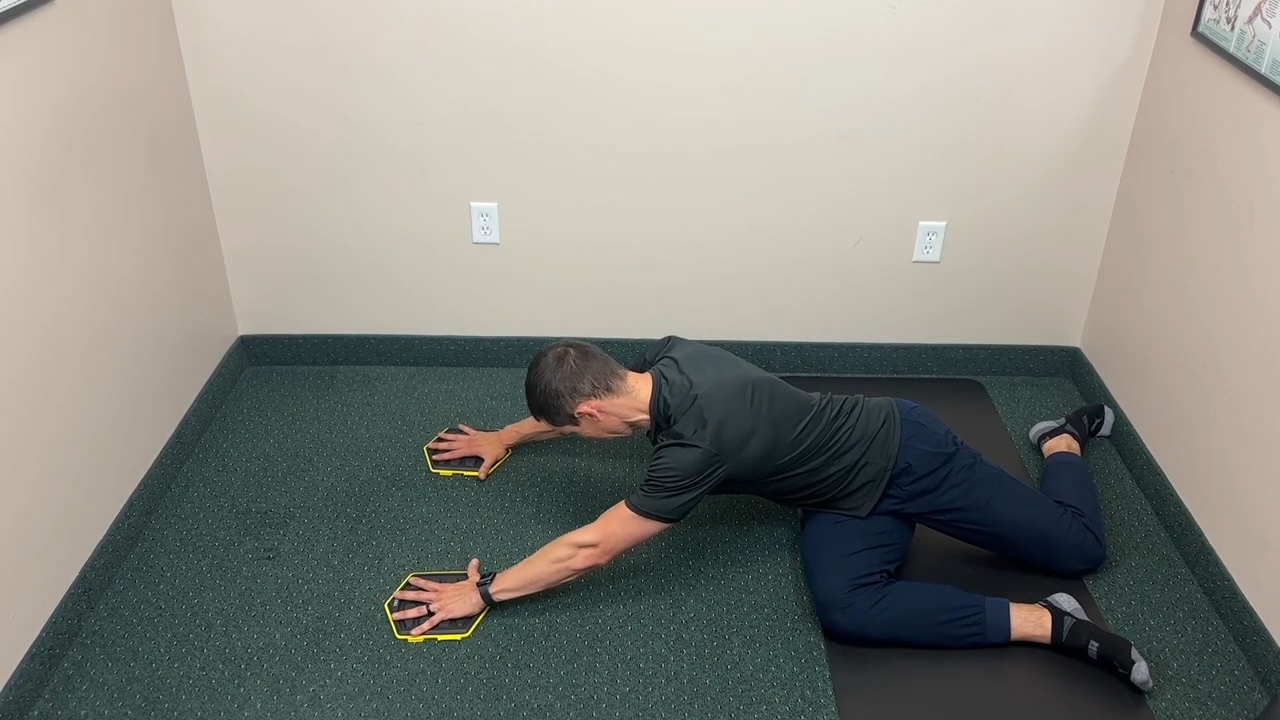
This is a specific rotational half-kneeling stance: one knee is on the ground and the opposite foot is forward, creating a rotationally asymmetric position between the pelvis, trunk, and shoulder girdle. The term “high oblique” refers to the orientation of the trunk — the torso is slightly rotated and the ribs are elevated on one side, loading the obliques and lat in a way that bilateral positions don’t achieve. The slider arms then reach out from this rotated starting point, extending the reach of the lat eccentrically while the trunk obliques work to resist the rotation the slider movement would otherwise create.
Build These First
This is an advanced exercise. Foundational shoulder stability should be established through these exercises before progressing here:
Step-by-Step Instructions
Set up slider pads and the 9 month high oblique position
Place slider pads (or furniture sliders) on a smooth floor surface. Come to a half-kneeling position — one knee down, the opposite foot forward. Rotate the trunk slightly so it is oriented toward the forward leg side, creating the asymmetric “high oblique” position. Place both hands on the sliders in front of you, arms relatively straight but not locked.
Establish shoulder blade position and abdominal pre-tension
Before sliding, press firmly through both hands to engage the serratus anterior and activate the shoulder stabilizers — feel the shoulder blades spread slightly away from the spine (protraction) and become solid rather than winging. Create gentle abdominal pressure to stabilize the trunk. Drive the down knee gently into the floor to activate the glute on that side and maintain pelvic position.
Slide the arms forward with eccentric lat control
Slowly slide both arms forward — reaching out in front of you while maintaining shoulder blade engagement and trunk position. The latissimus dorsi will lengthen eccentrically as the arms extend; this is the primary training stimulus. Move only as far as you can control the position without the shoulders collapsing inward, the lower back arching, or the trunk rotating further than the starting position. This is not a race to reach maximum distance.
Hold briefly and feel the integrated activation
At the end-range position (within your controlled range), hold for 1–2 seconds. This is where the shoulder stabilizers, lats, obliques, and hip stabilizers all load simultaneously in the integrated position. The pause before the return also trains the nervous system to recognize and stabilize this shoulder position before the concentric demand of pulling back.
Pull back to the starting position with concentric control
Draw the arms back to the start by pulling through the lats and rear shoulder musculature — think of initiating the return from the armpits and posterior shoulder rather than from the hands. This concentric phase trains the lats and lower traps to actively load the shoulder back into a stable position after an extended reach — the functional pattern most relevant to throwing, pressing, and overhead activities.
Perform the prescribed reps, then switch sides
Complete the prescribed repetitions on one side before switching to the opposite half-kneeling position. Because the 9 month position is asymmetric by design, both sides must be trained — but they may feel different and have different ranges of comfortable control, which is expected and clinically meaningful information for Dr. Dockery’s assessment.
Stop if you notice: the shoulder blade winging away from the ribcage during the slide, the lower back arching excessively at end range, the trunk rotating beyond the starting position as the arms extend, or the neck tensing and the upper trap substituting. Any of these indicates the range is beyond current shoulder stability capacity — reduce the sliding distance until control is restored throughout the full arc.
What You Need
Slider pads designed for exercise work best and can be found at most sports retailers. Furniture sliders (the felt or plastic discs used under furniture legs) work on hardwood, tile, or laminate floors. On carpet, sliders may not glide freely — in that case, smooth plastic plates or even paper plates can substitute. The key is a surface that allows controlled, low-friction sliding without sticking or catching mid-movement.
Key Technique Points
Watch the Technique
Why This Exercise Works
Frequently Asked Questions
This is an advanced exercise. Stop if shoulder pain, winging of the shoulder blade, or lower back discomfort develops, and consult Dr. Dockery before proceeding if you are unsure whether this exercise is appropriate for your current level of rehabilitation.
Advanced Shoulder Rehabilitation in Livonia, MI
The 9 Month High Oblique Shoulder Slider is most effective as part of a progressive shoulder stabilization program. Dr. Dockery serves patients throughout Livonia, Farmington Hills, Redford, Plymouth, and greater Wayne County.