
Single Leg Stance with Sliders | Balance & Hip Stability Exercise | Life in Motion Chiropractic Livonia MI

Single Leg Stance
with Sliders

A dynamic balance and hip stability exercise prescribed by Dr. Dockery that combines single leg stance with slider-based reaching in multiple planes — simultaneously challenging the standing hip stabilizers, ankle proprioception, and trunk control in a functional, low-impact movement pattern.
5–10 min/day Intermediate–Advanced Sliders or smooth surface Livonia, MI
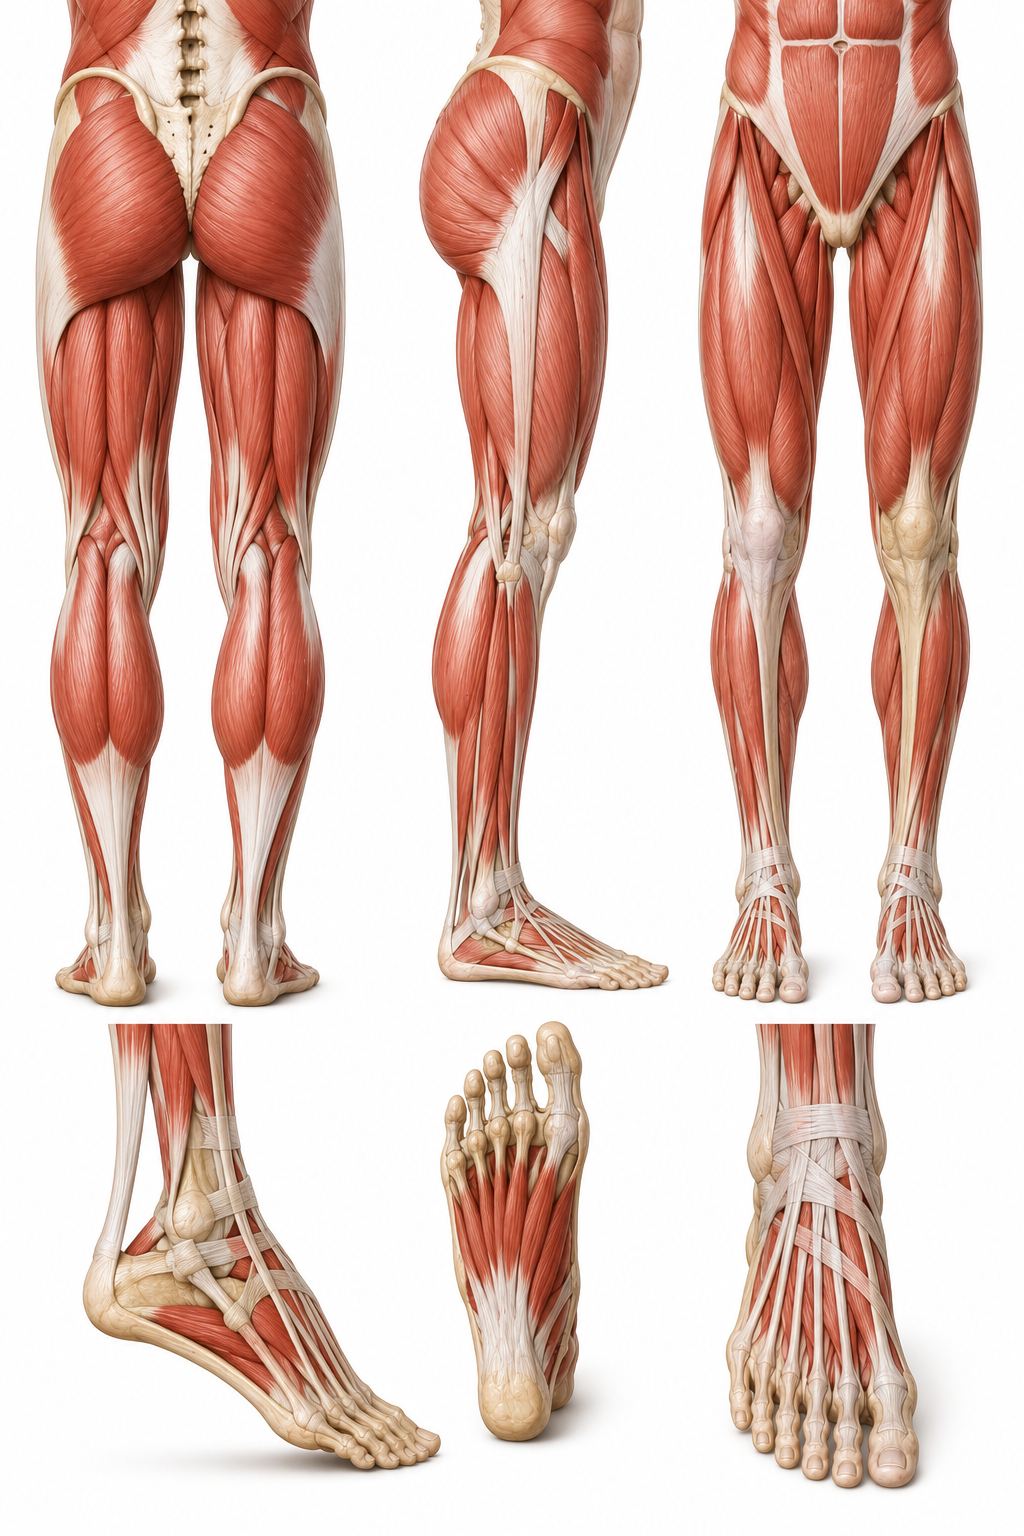
Lower extremity anatomy — glute, quad, hamstring, calf and foot muscles — Life in Motion Chiropractic Livonia MI

What Is Single Leg Stance with Sliders?

Single Leg Stance with Sliders is a balance and lower extremity stability exercise that challenges the body to maintain single-leg stance while the opposite foot slides a slider pad outward in different directions — forward, to the side, and diagonally. Because the sliding foot never bears meaningful weight, virtually all load transfers to the standing leg, demanding high levels of hip abductor strength, gluteus medius activation, ankle proprioception, and trunk lateral stability simultaneously.

The key training stimulus is the standing leg, not the sliding one. The slider foot is simply a tool for shifting the center of mass progressively further from base of support, increasing the demand on the standing hip — particularly the gluteus medius and gluteus minimus — to prevent the pelvis from dropping. This is called a Trendelenburg challenge: the same hip drop pattern seen during walking and running that, when poorly controlled, contributes to hip pain, knee pain, IT band syndrome, and low back pain.

As NIH research on gluteus medius function confirms, the gluteus medius is one of the most clinically important muscles for lower extremity injury prevention — and single-leg loading exercises are among the most effective ways to train it in functional, weight-bearing positions.

Primary muscles trained (standing leg): Gluteus medius and minimus (lateral hip stabilizers preventing pelvic drop), gluteus maximus (hip extension and rotational control), hip external rotators (piriformis, obturators — controlling femoral alignment), soleus and gastrocnemius (ankle stability), tibialis anterior and posterior (dynamic ankle control), and the intrinsic foot muscles (arch support during sustained single-leg load). The trunk obliques and quadratus lumborum also co-activate to maintain a level pelvis.

Clinical note: This exercise is commonly prescribed as part of hip rehabilitation, knee rehabilitation (particularly patellofemoral pain), ankle sprain recovery, and low back pain programs where weak hip stabilizers are a contributing factor. It bridges the gap between basic hip strengthening exercises like the Banded Clam and Banded Glute Bridge and more demanding functional activities like single-leg squats and running.

Common Conditions This Exercise Addresses

Hip pain & instability
IT band syndrome
Patellofemoral knee pain
Ankle sprain rehabilitation
Low back pain (hip stability component)
Running & gait mechanics
Hip & SI joint dysfunction
Fall prevention & balance training

Forward, Lateral & Diagonal Reaches

The slider reach direction determines which aspect of hip and trunk stability is most challenged:

Forward
Sagittal plane
Challenges hip extension and anterior-posterior balance; demands hip flexor length and glute activation on the standing side
Lateral
Frontal plane
Maximum challenge to gluteus medius; the lateral reach is the highest Trendelenburg demand of the three directions
Diagonal
Transverse plane
Trains rotational hip control and combined frontal-sagittal stability; the most functional direction for gait and sport

Step-by-Step Instructions

1

Set up on a smooth surface with one slider pad

Stand on a smooth floor (hardwood, tile, or laminate) with one foot on a slider pad and the other foot firmly planted. Position the slider foot slightly in front of the standing foot to start. Have a wall, chair back, or countertop within arm’s reach for safety if needed — especially on the first few attempts. Feet should be roughly hip-width apart at the starting position.

2

Shift your weight fully onto the standing foot

Transfer your full body weight onto the standing leg. The slider foot should rest lightly on the pad — it guides the movement but should not bear meaningful weight. Feel the standing hip and glute engage as the load transfers. The standing knee should track directly over the second toe — not caving inward (valgus). Take a moment to establish this loaded position before any slider movement begins.

3

Maintain a tall, neutral trunk throughout

Stand tall with a slight forward lean at the hip — not at the waist. The hips should hinge very slightly forward so the glute of the standing leg is engaged, not the lower back. Keep the trunk long and avoid excessive side-bending toward the standing leg, which is the most common compensation — it reduces the Trendelenburg demand by shifting center of mass over the base rather than letting the hip stabilizers do the work.

4

Slowly slide the foot in the prescribed direction

Slide the non-weight-bearing foot slowly in the direction Dr. Dockery has prescribed — forward, to the side, or diagonally. The slider should glide smoothly; do not push down into it. Move only as far as you can while maintaining pelvic level (no hip drop on the slider side), standing knee alignment (no valgus), and a controlled trunk. The standing hip should feel challenged and working throughout the reach.

5

Hold at end range briefly, then return with control

At the end of the slide, pause for 1–2 seconds in the challenged position. This pause is the highest-demand point of the exercise and the most valuable training moment for the hip stabilizers. Then draw the slider foot back to the starting position with the same controlled speed — do not allow it to snap or drift back passively. The return phase is an important eccentric hip stabilizer training component.

6

Complete the prescribed reps, then switch sides

Complete the prescribed repetitions on one side before switching the slider to the other foot and repeating. Because hip stability is highly side-specific, both sides should be trained in every session. If one side is significantly weaker, Dr. Dockery may prescribe additional volume on the weaker side — this asymmetry is common and clinically meaningful information for your rehabilitation program.

Stop or regress the exercise if you notice: the hip on the slider side dropping below the standing hip (Trendelenburg sign) during any part of the movement; the standing knee caving inward; the trunk leaning excessively to the standing side; or the foot arching and rolling inward. Any of these indicates the slider range or exercise level exceeds current hip stability — reduce the reach distance or return to a foundational hip exercise first.

How This Exercise Fits the Progression

Banded Clam
Non-weight-bearing hip abductor activation
Banded Glute Bridge
Hip extension + abductor co-activation
Single Leg Stance with Sliders
Weight-bearing dynamic hip stability ← You are here
Single Leg Squat / Step-Down
Full eccentric hip loading

Key Technique Points

Keep the pelvis level throughout the entire movement — this is the single most important cue; any hip drop on the slider side means the exercise is beyond current standing hip stability capacity; reduce range before adding reach distance
Standing knee tracks over the 2nd toe — a valgus (inward-caving) knee is the second most common compensation and signals that the hip external rotators and glute medius are not adequately activating; think “screw the foot into the floor” to create external rotation torque in the standing leg
The slider foot is a feather on the floor — most of the resistance on the slider pad means most of the weight has shifted back to the slider foot; the standing leg should feel like it is doing almost all of the work throughout each rep
Slight hip hinge on the standing side — a subtle forward lean at the hip (not the lower back) pre-activates the glute before the slide and maintains posterior chain engagement throughout the reach
The return is as important as the reach — pulling the slider back actively trains the hip adductors and eccentric hip abductors, both of which are critical for gait control; do not let the slider drift back passively
Foot arch stays lifted — the standing foot should maintain its arch; if the arch rolls inward (overpronates) during the slide, it indicates the ankle and foot stabilizers are not co-activating; consider beginning with a slightly narrower reach until foot control improves

Watch the Technique

Single Leg Stance with Sliders — Life in Motion Chiropractic

Dr. Dockery demonstrates the full single leg stance slider sequence — including the standing leg setup, forward reach, lateral reach, diagonal reach, and the most common compensations to watch for and correct.

Why This Exercise Works

Trains hip stability in weight-bearing — where it actually matters — the gluteus medius and pelvis control patterns trained here directly transfer to walking, stair climbing, running, and every other single-leg weight-bearing activity; non-weight-bearing exercises like the clam cannot replicate this functional demand
Challenges balance and hip stability simultaneously in three planes — most hip exercises train in a single plane; the forward, lateral, and diagonal slider directions progressively load the hip stabilizers in the frontal, sagittal, and transverse planes that real movement requires
Trains the Trendelenburg control pattern that prevents knee and hip injury — the lateral reach specifically loads the standing gluteus medius at the highest biomechanical demand point, building the capacity to prevent pelvic drop during gait that drives IT band syndrome, patellofemoral pain, and hip joint stress
Integrates ankle proprioception and foot stability — sustained single-leg stance on a hard surface constantly activates the foot and ankle stabilizers, improving proprioceptive sensitivity at the ankle — a key deficit after ankle sprains and in patients with recurrent ankle instability
Low impact and joint-friendly — the slider removes ground reaction forces from the non-weight-bearing foot entirely, making this a highly accessible intermediate-to-advanced hip stability exercise for patients who cannot yet tolerate single-leg squats or step-downs due to knee or hip pain
Progressively scalable — difficulty can be adjusted by increasing reach distance, adding arm reaches in opposition, performing on a slightly unstable surface, or increasing hold duration at end range — all without changing the fundamental movement pattern

Frequently Asked Questions

My hip drops to the slider side every time. What am I doing wrong?
A hip drop (Trendelenburg sign) during the slide means the gluteus medius and minimus on the standing side are not strong or active enough yet to maintain a level pelvis against the increased load. This is extremely common and is actually the reason the exercise is prescribed — it identifies the exact deficit the program is targeting. The solution is to reduce the slider reach distance significantly (sometimes to just a few inches) until pelvic level can be maintained throughout the full arc. Gradually increase reach distance as hip strength improves. It is better to slide 4 inches with a level pelvis than 12 inches with a hip drop — the former trains the correct pattern, the latter reinforces the compensation.
How is this different from the Banded Clam and Glute Bridge I’ve been doing?
The Banded Clam and Banded Glute Bridge train the hip abductors and extensors in non-weight-bearing or partially weight-bearing positions, which is appropriate for early rehabilitation when pain or weakness prevents full weight-bearing loading. The Single Leg Stance with Sliders is the next step: it trains exactly the same muscles but now in full weight-bearing, where the nervous system must coordinate hip stability, ankle proprioception, trunk control, and foot arch support simultaneously. This functional integration is what the earlier exercises cannot provide — and it is the integration that actually transfers to walking, running, and daily movement.
Which direction of reach should I start with?
Most patients begin with the forward (sagittal plane) reach, which is the least demanding on the lateral hip stabilizers and provides the most stable starting position. The lateral reach is the most demanding because it creates the maximum hip abductor moment arm, and the diagonal reach is typically introduced after both forward and lateral reaches can be performed with good pelvic control. Dr. Dockery will prescribe the specific direction or sequence based on your current stability assessment findings.
I feel this in my knee, not my hip. Is that normal?
A mild sense of knee stability challenge during single-leg stance is normal — the quadriceps and patellar tendon are working to stabilize the standing knee. However, if you are feeling significant knee pain, a sharp sensation at the front or side of the knee, or the knee is visibly caving inward during the exercise, stop and consult Dr. Dockery before continuing. Patellofemoral pain during single-leg exercises can indicate a knee alignment issue, quad weakness, or that the exercise level is too advanced for the current stage of knee rehabilitation. The exercise should primarily feel like a hip and glute challenge with the knee working in the background — not the reverse.
Can I hold onto something for balance?
Yes — particularly when first learning the exercise or after any procedure, injury, or period of inactivity that has reduced your single-leg confidence. Lightly touching a wall, chair back, or countertop with one or two fingers is perfectly acceptable and does not significantly reduce the hip training stimulus as long as you are not leaning into the support. The goal over time is to progress from two-finger touch → one-finger touch → no support, as confidence and hip stability improve. Never feel that using a support is “cheating” — a well-executed assisted rep trains the correct pattern far more effectively than a compensated unsupported one.
Is this exercise safe after a hip replacement or hip labral repair?
This depends entirely on the specific surgery, the implant or repair type, the current healing stage, and your surgeon’s weight-bearing and range-of-motion restrictions. Some hip replacement protocols allow single-leg stance in early recovery; others have specific precautions against hip adduction or flexion beyond certain degrees that could be triggered by different slider directions. Similarly, labral repairs have specific motion restrictions that vary by the extent of the repair. Always confirm with your surgeon and Dr. Dockery before attempting this exercise following any hip surgery — and if cleared, begin with only a finger-touch balance assist and very minimal reach distance.

Stop the exercise if pain increases or new joint symptoms develop, and consult Dr. Dockery before modifying the program. This exercise should complement, not replace, individualized clinical assessment and care.

Hip Stability & Balance Rehabilitation in Livonia, MI

Single Leg Stance with Sliders is most effective as part of a progressive lower extremity program. Dr. Dockery serves patients throughout Livonia, Farmington Hills, Redford, Plymouth, and greater Wayne County.

Or call us at 734-427-6333